Mục lục
Model là gì?
Model là kết quả từ quá trình compile Schema đã được định nghĩa trước đó. Một instance của model được gọi là document. Model sẽ chịu trách nhiệm chính trong việc đọc và ghi dữ liệu từ database MongoDB.
Compile Model
Khi bạn goi mongoose.model() trên Schema đã được định nghĩa trước đó, Mongoose sẽ compile Schema thành model.
Ví dụ
import mongoose from 'mongoose';

const UserSchema = mongoose.Schema({
    email: String,
    password: String,
    fullname: String,
    gender: {
        type: String,
        enum: ['male', 'female', 'other']
    },
    createdAt: {
        type: Date,
        default: Date.now
    },
    note: String
});

mongoose.model('User', UserSchema);
mongoose.model() nhận 2 tham số, tham số đầu tiên là collection name. Tham số thứ 2 là Schema.
Note: Mongoose sẽ tự động chuyển tên của collection thành chữ thường và chuyển sang dạng số nhiều. Ví dụ User -> users.
Thao tác dữ liệu
Tạo file mongoose.model.js tại root project. Khởi tạo UserSchema và UserModel trong file mongoose.model.js.
// File mongoose.model.js
import mongoose from 'mongoose';

// connect to MongoDB
mongoose.connect('mongodb://localhost/gettingstarted', {useNewUrlParser: true});

const UserSchema = mongoose.Schema({
    email: String,
    password: String,
    fullname: String,
    gender: {
        type: String,
        enum: ['male', 'female', 'other']
    },
    createdAt: {
        type: Date,
        default: Date.now
    },
    note: String
});

const UserModel = mongoose.model('User', UserSchema);
Create document
Một instance của model được gọi là document. Sử dụng save() method để lưu document xuống dabase MongoDB.
// File mongoose.model.js
// ... more code
// Tạo User từ UserModel
const createUser = () => {
    const newUser = new UserModel({
        email: "[email protected]",
        password: '123456',
        fullname: 'Deft Blog',
        gender: "male"
    });

    try {
        newUser.save();
    } catch(err) {
        console.log(err);
    }
}

createUser();
Windows: .\node_modules\.bin\babel-node .\mongoose.model.js
MacOS: ./node_modules/.bin/babel-node mongoose.model.js
Note: Sẽ không có một newUser nào được lưu hoặc xoá cho đến khi connection của model được thiết lập. Mặc định model của bạn sẽ sử dụng connection mặc định của mongoose,
mongoose.connect('mongodb://localhost/gettingstarted', {useNewUrlParser: true});
Nếu bạn muốn khởi tạo một custom connection, chúng ta sẽ sử dụng model() của connection custom mà chúng ta vừa tạo ra.
var connection = mongoose.createConnection('mongodb://localhost:27017/test');
var UserModel = connection.model('User', UserSchema);
Query
Mongoose hỗ trợ rất nhiều hàm truy vấn dữ liệu, có thể kể đến như find, findById, findOne etc. Trong khuôn khổ bài này chúng ta sẽ không đi sâu và truy vấn dữ liệu. Mình sẽ demo cách tìm User theo email.
// File mongoose.model.js
// ... more code
const findUser = async () => {
    try {
        const userFind = await UserModel.findOne({email: "[email protected]"});
        console.log("Find user:" + userFind);
    } catch(err) {
        console.log(err);
    }
}

findUser();
Điều kiện: Đã chạy step create document
Run
- Windows: .\node_modules\.bin\babel-node .\mongoose.model.js
- MacOS: ./node_modules/.bin/babel-node ./mongoose.model.js
Output:
Find user: { _id: 5dce3dffc2b92f5ad48bce79,
email: ‘[email protected]’,
password: ‘123456’,
fullname: ‘Deft Blog’,
gender: ‘male’,
createdAt: 2019-11-15T05:56:15.553Z,
__v: 0 }
Update
Mỗi model đều có method updateOne, update etc để cập nhật dữ liệu trong collection tương ứng.
// File mongoose.model.js
// ... more code
const updateUser = async () => {
    try {
        await UserModel.updateOne({email: "[email protected]"}, {password: "abczyz"});
        const userFind = await UserModel.findOne({email: "[email protected]"});
        console.log("Update user: " + userFind);
    } catch(err) {
        console.log(err);
    }
}

updateUser();
Điều kiện: Đã chạy step create document
Run:
- Windows: .\node_modules\.bin\babel-node .\mongoose.model.js
- MacOS: ./node_modules/.bin/babel-node mongoose.model.js
Output
Update user: { _id: 5dce3dffc2b92f5ad48bce79,
email: ‘[email protected]’,
password: ‘abczyz’,
fullname: ‘Deft Blog’,
gender: ‘male’,
createdAt: 2019-11-15T05:56:15.553Z,
__v: 0 }
Detele
Model trong mongoose có sẵn các static method deleteOne, deleteMany dùng để xóa tất cả các document khớp với condition.
// File mongoose.model.js
// ... more code
// delete user

const deleteUser = async () => {
    try {
        await UserModel.deleteOne({email: "[email protected]"});
        const userFind = await UserModel.findOne({email: "[email protected]"});
        console.log("Delete user: " + userFind);
    } catch(err) {
        console.log(err);
    }
}

deleteUser();
Điều kiện: Đã chạy step create document
Run:
- Windows: .\node_modules\.bin\babel-node .\mongoose.model.js
- MacOS: ./node_modules/.bin/babel-node mongoose.model.js
Output: Delete user: null
Kết
Ở các phần trên chúng ta đã tìm hiểu được cách khởi tạo một Model từ Schema, tạo và sao lưu document xuống database, truy vấn dữ liệu etc.
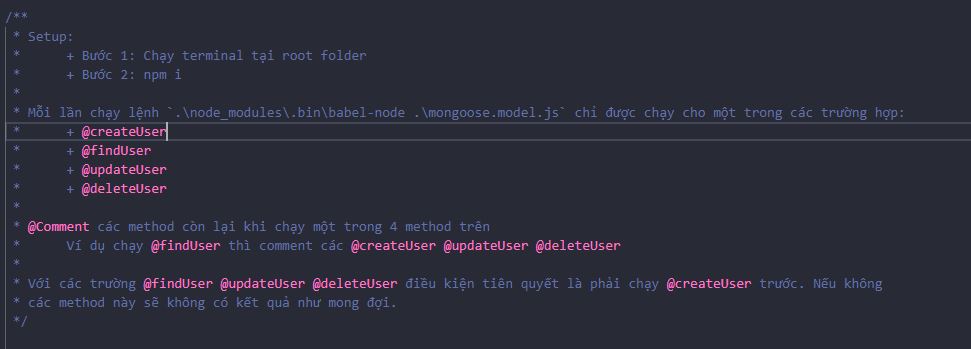
Để chắc rằng các bạn có thể chạy thực nghiệm mình đã push code lên gitlab. Các bạn có thể download code về và chạy thử xem kết quả. Ở đầu file mình có hướng dẫn cụ thể mà chạy các bước cho đúng để được kết quả mong muốn nên các bạn nhớ đọc.
Mình cũng xin post những điểm note trên đây
Download project tại: mongoose_tutorial