Mục lục
Layout trong Java Swing được sử dụng để chỉ định bố cục các thành con bên trong một container. Container cũng là một thành phần giao diện của Java Swing, tuy nhiên nó có thể chứa các thành phần nhỏ hơn như Button, Label, Input, etc. Java swing cung cấp một số layout, đối với mỗi loại layout được sử dụng thì các thành con bên trong chúng có thể được trình bày khác nhau.
Dưới đây là danh sách các Layout trong Java Swing:
- FlowLayout
- BorderLayout
- CardLayout
- BoxLayout
- GridLayout
- GridBagLayout
- GroupLayout
- SpringLayout
Java Swing Layout
Tiếp theo chúng ta sẽ đi tìm hiểu từng layout và lấy ví dụ để hiểu rõ hơn cách hoạt động của chúng.
FlowLayout
FlowLayout bố trí các thành phần con theo hướng từ trái sang phải hoặc từ phải sang trái trên cùng một dòng. Nếu tất cả các thành phần con không thể chứa trên cùng một dòng so với chiều dài tối đa của container thì chúng sẽ được sắp xếp trên một hàng mới.
Để khởi tạo một FlowLayout chúng ta có 3 constructor sau:
- FlowLayout() – Tạo mới một FlowLayout object với các giá trị mặc định như canh giữa các thành phần con, khoảng cách ngang và dọc giữa các thành phần con là 5.
- FlowLayout(int align) – Tương tự như trên, tuy viên việc canh các phần tử ở giữa theo mặc định sẽ được ghi đè bởi giá trị align được truyền vào.
- FlowLayout(int align, int hgap, int vgap) – Đây là constructor với đầy đủ các tham số chỉ định việc canh các phần tử, khoảng cách chiều ngang với hgap và chiều dọc vgap.
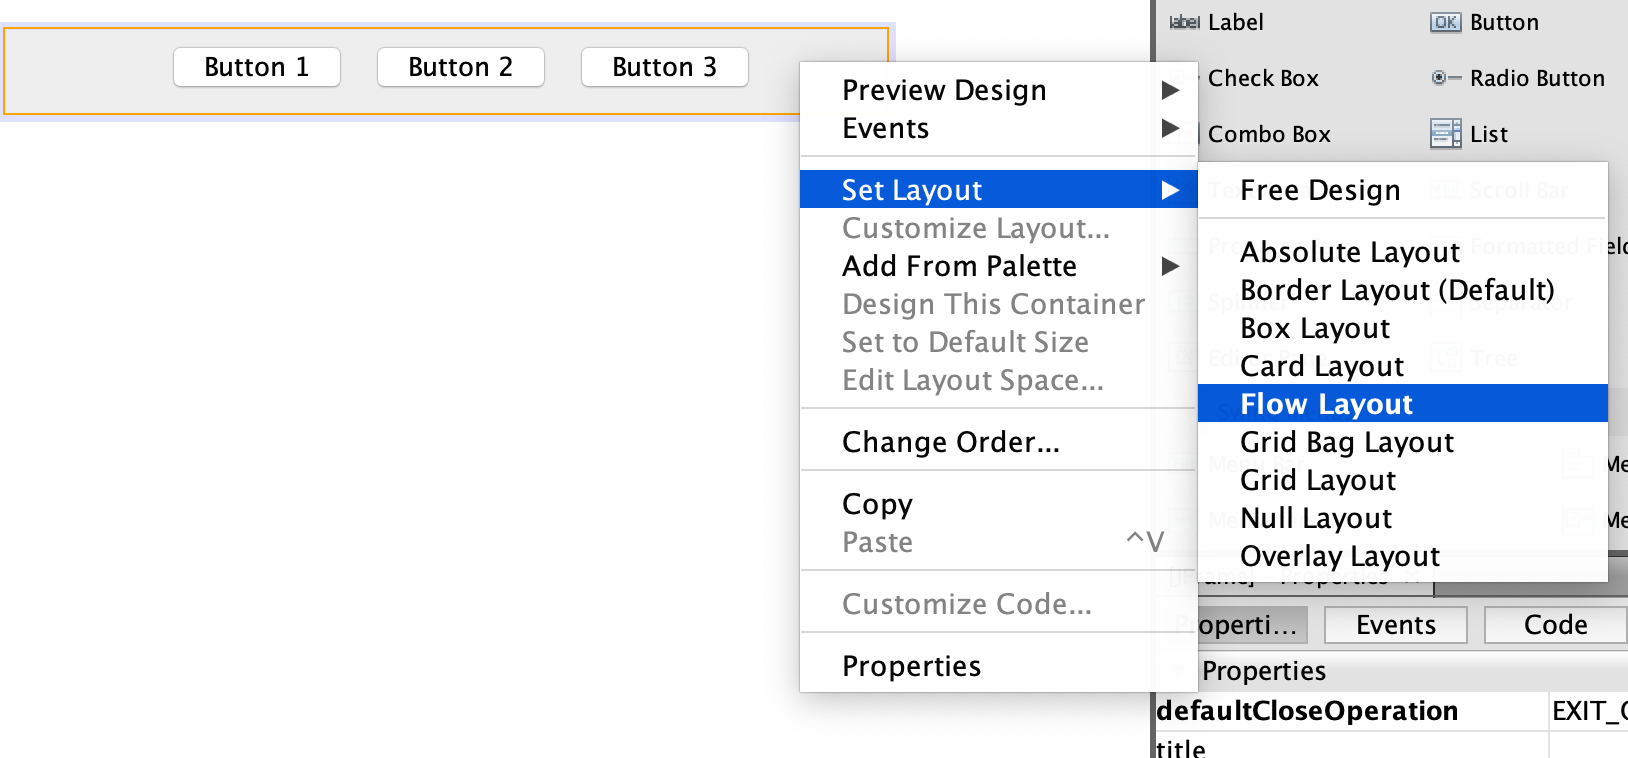
Để chỉ định layout cho một container, ví dụ dụ JFrame trong Netbeans với giao diện kéo thả thì chúng ta chỉ cần Click phải chuột -> Set Layout, sau đó chọn layout tương ứng.
 Sau khi gán layout thành công cho JFrame, chúng ta có thể chỉnh các thuộc tính canh chỉnh, khoảng cách giữa các thành phần con trong tab properties của FlowLayout.

Với giá trị alignment = 1 canh giữa các thành phần con, mình nắm và kéo thả 3 button vào sẽ được như sau:
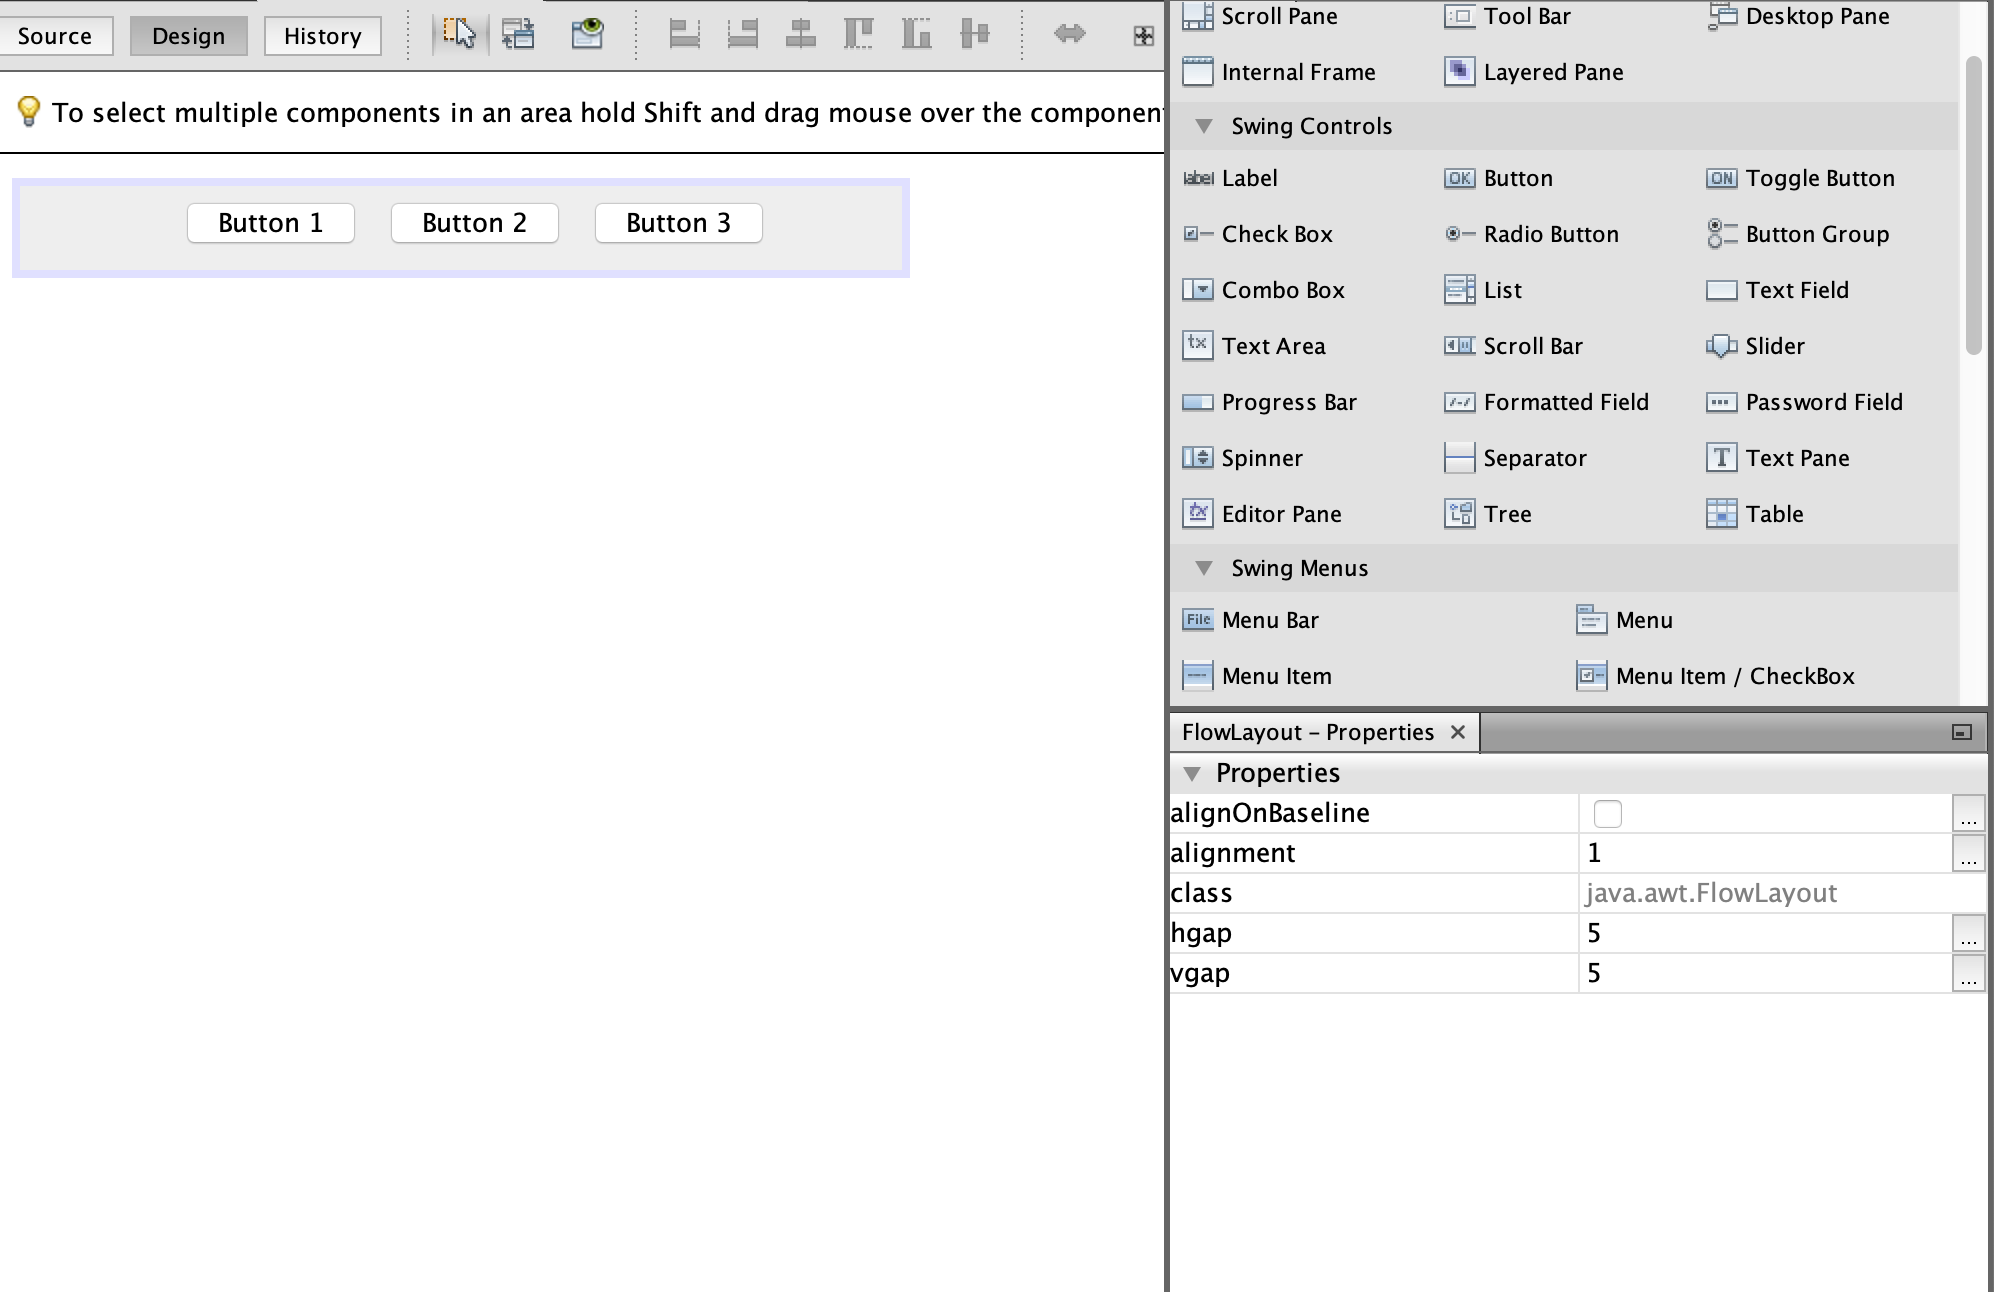
Có thể thấy 3 Button được canh giữa theo chiều ngang và khoảng cách giữa chúng đều nhau bằng 5.
Nếu không muốn sử dụng giao diện kéo thả thì chúng ta có thể code thông thường như sau
package com.company;

import javax.swing.JButton;
import javax.swing.JFrame;
import javax.swing.JPanel;

import java.awt.FlowLayout;

public class Main {

    public static void main(String[] args) {
        // Create and set up a frame window
        JFrame.setDefaultLookAndFeelDecorated(true);
        JFrame frame = new JFrame("Layout");
        frame.setDefaultCloseOperation(JFrame.EXIT_ON_CLOSE);

        // Define new buttons
        JButton jb1 = new JButton("Button 1");
        JButton jb2 = new JButton("Button 2");
        JButton jb3 = new JButton("Button 3");

        // Define the panel to hold the buttons
        JPanel panel = new JPanel();
        FlowLayout flowLayout = new FlowLayout();
        flowLayout.setAlignment(FlowLayout.LEFT);
        flowLayout.setHgap(10);
        panel.setLayout(flowLayout);
        panel.add(jb1);
        panel.add(jb2);
        panel.add(jb3);

        // Set the window to be visible as the default to be false
        frame.add(panel);
        frame.pack();
        frame.setVisible(true);
    }

}
Ở đoạn code trên mình đã thay đổi cách canh chỉnh các phần tử phía bên trái, và khoảng cách bề ngang là 10 thay vì 5 như mặc định. Mình tin rằng nếu làm việc lâu hơn nữa với Swing thì các bạn có thể thích cách tự code hơn là sử dụng giao diện kéo thả của Netbeans vì code được sinh ra bởi Netbeans rất khó để chỉnh sửa và có những đoạn code các bạn không thể xoá đi được.
Nhưng ở giai đoạn đầu, hãy cứ dùng kéo thả đi đã nhé, chừng nào lên tay nghề rồi hãy tính.
BorderLayout
BorderLayout tổ chức các thành phần con thành 5 vùng NORTH, SOUTH, EAST, WEST and CENTER. Ở mỗi vùng chỉ có thể chứa tối đa một thành phần con, khi thêm các phần tử khác nhau vào BorderLayout bạn cần chỉ định 1 trong 5 vùng trên.
Tương tự để chỉ định BorderLayout cho một container ta chỉ cần Click phải chuột -> Set Layout -> Border Layout.
Tiến hành kéo thả 5 Button vào một JFrame có layout được đặt là BorderLayout.

Hoặc chúng ta có thể thực thi đoạn code dưới đây
package com.company;

import javax.swing.JButton;
import javax.swing.JFrame;
import javax.swing.JPanel;

import java.awt.*;

public class Main {

    public static void main(String[] args) {
        // Create and set up a frame window
        JFrame.setDefaultLookAndFeelDecorated(true);
        JFrame frame = new JFrame("Layout");
        frame.setDefaultCloseOperation(JFrame.EXIT_ON_CLOSE);

        // Define the panel to hold the buttons
        JPanel panel = new JPanel();
        JButton jb1 = new JButton("NORTH");
        JButton jb2 = new JButton("SOUTH");
        JButton jb3 = new JButton("WEST");
        JButton jb4 = new JButton("EAST");
        JButton jb5 = new JButton("CENTER");

        // Define the panel to hold the buttons
        panel.setLayout(new BorderLayout());
        panel.add(jb1, BorderLayout.NORTH);
        panel.add(jb2, BorderLayout.SOUTH);
        panel.add(jb3, BorderLayout.WEST);
        panel.add(jb4, BorderLayout.EAST);
        panel.add(jb5, BorderLayout.CENTER);

        // Set the window to be visible as the default to be false
        frame.add(panel);
        frame.pack();
        frame.setVisible(true);
    }

}
CardLayout
CardLayout sắp xếp các thành phần con thành một Stack, chúng sẽ chồng lên nhau và tại mỗi thời điểm chúng ta chỉ có thể thấy một thành phần con duy nhất cho đến khi CardLayout chuyển sang thành phần con tiếp theo.
Ví dụ tạo một JFrame với layout được chỉ định là CardLayout, chứa 3 Button sếp chồng lên nhau. Cứ mỗi khi click vào một Button thì chúng ta sẽ xử lý sự kiện để chuyển sang hiện thị Button tiếp theo và xoay vòng.
package com.company;

import javax.swing.JButton;
import javax.swing.JFrame;

import java.awt.CardLayout;
import java.awt.Container;
import java.awt.event.ActionEvent;
import java.awt.event.ActionListener;

public class CardLayoutExample extends JFrame implements ActionListener {

    public static CardLayout card = new CardLayout(40, 30);
    public static Container c;
    JButton jb1, jb2, jb3;

    public CardLayoutExample() {
        c = getContentPane();
        c.setLayout(card);

        // Define new buttons
        jb1 = new JButton("Button 1");
        jb2 = new JButton("Button 2");
        jb3 = new JButton("Button 3");

        jb1.addActionListener(this);
        jb2.addActionListener(this);
        jb3.addActionListener(this);

        c.add(jb1);
        c.add(jb2);
        c.add(jb3);
    }

    public static void main(String[] args) {
        // Create and set up a frame window
        CardLayoutExample cl = new CardLayoutExample();
        cl.setSize(300, 300);
        cl.setVisible(true);
        cl.setDefaultCloseOperation(JFrame.EXIT_ON_CLOSE);

    }

    // Action listener
    public void actionPerformed(ActionEvent e) {
        card.next(c);
    }

}
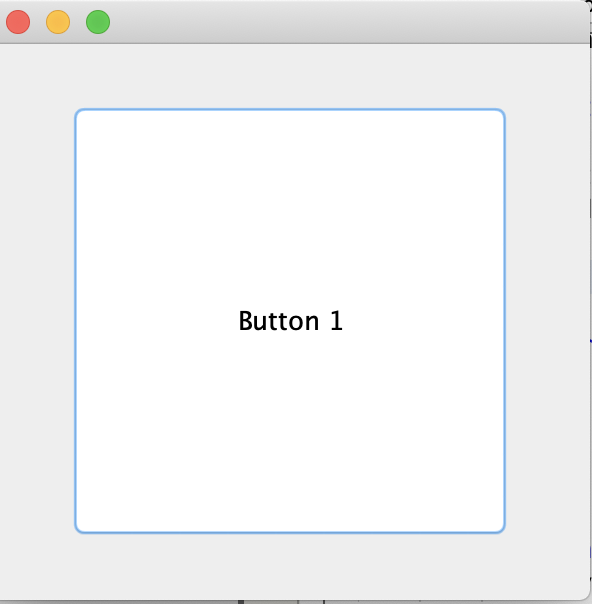
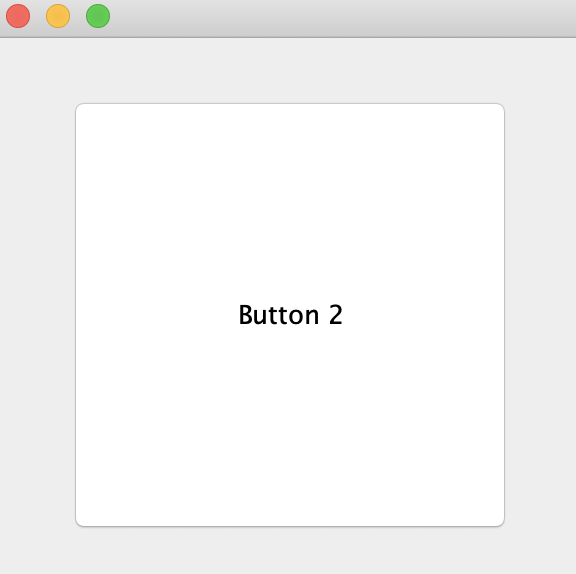
Sau khi mình click vào Button 1 thì lập tức sẽ chuyển sang hiển thị Button 2
BoxLayout
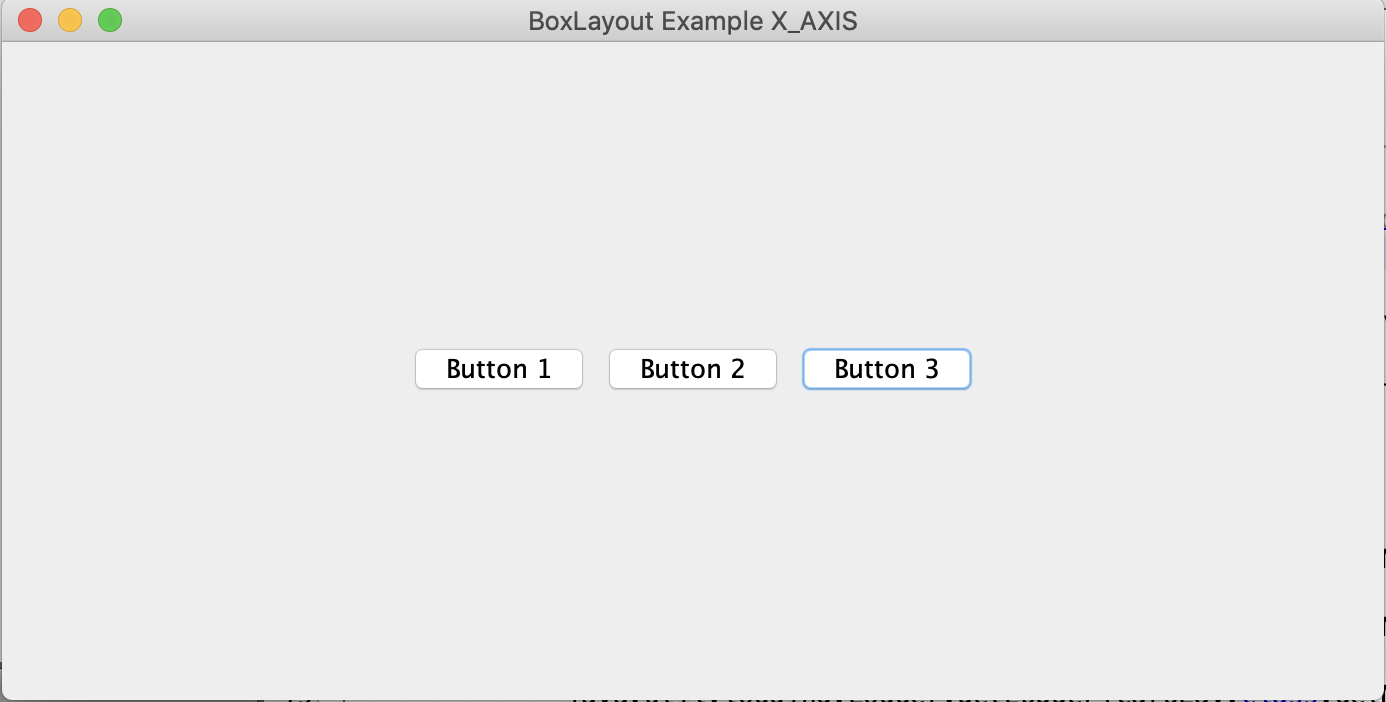
BoxLayout được sử dụng để sắp xếp các thành phần con theo chiều dọc hoặc theo chiều ngang. Trong BoxLayout cung cấp các hằng số X_AXIS, Y_AXIS trong đó X_AXIS dùng để sắp xếp các thành phần con theo chiều ngang từ trái sang phải, còn Y_AXIS thì theo chiều dọc từ trên xuống dưới.
Dưới đây là ví dụ tạo một BoxLayout sắp xếp theo chiều ngang.
package com.company;

import javax.swing.*;
import javax.swing.border.EmptyBorder;
import java.awt.*;

public class SwingBoxLayoutAxis {

    public static void main(String[] args) {
        // Create and set up a frame window
        JFrame.setDefaultLookAndFeelDecorated(true);
        JFrame frame = new JFrame("BoxLayout Example X_AXIS");
        frame.setDefaultCloseOperation(JFrame.EXIT_ON_CLOSE);

        // Tạo mới Panel
        JPanel panel = new JPanel();

        // Tạo Boxlayout với hằng số X_AXIS
        BoxLayout boxlayout = new BoxLayout(panel, BoxLayout.X_AXIS);

        panel.setLayout(boxlayout);

        // Tạo Border cho panel
        panel.setBorder(new EmptyBorder(new Insets(150, 200, 150, 200)));

        // Tạo các Button
        JButton jb1 = new JButton("Button 1");
        JButton jb2 = new JButton("Button 2");
        JButton jb3 = new JButton("Button 3");

        // Thêm Button vào Panel
        panel.add(jb1);
        panel.add(jb2);
        panel.add(jb3);


        frame.add(panel);
        frame.pack();
        frame.setVisible(true);

    }

}
Kết quả
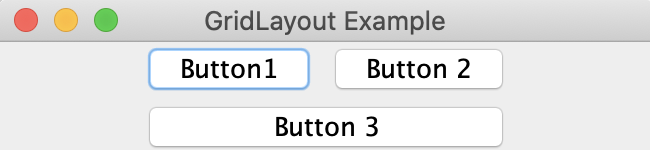
Để sắp xếp các Button theo chiều dọc trong layout, chúng ta chỉ cần thay đổi X_AXIS thành Y_AXIS
BoxLayout boxlayout = new BoxLayout(panel, BoxLayout.Y_AXIS);

GridLayout
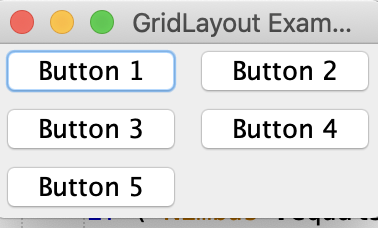
Trình quản lý GridLayout được sử dụng để bố trí các thành phần trong một lưới hình chữ nhật, lưới này đã được chia thành các hình chữ nhật có kích thước bằng nhau và một thành phần được đặt trong mỗi hình chữ nhật. Chúng ta có thể khởi tạo GridLayout thông qua các constructor sau:
- GridLayout() – Tạo GridLayout với duy nhất một dòng và một cột
- GridLayout(int row, int col) – Tạo GridLayout với row dòng và col cột.
- GridLayout(int row, int col, int hgap, int vgap) – Tạo GridLayout với row dòng và col cột, các phần tử trên cùng một dòng cách nhau hgap và trên cùng một cột cách nhau vgap.
Với đoạn mã sau, chúng ta có thể tạo một đối tượng bố trí lưới với hai hàng, ba cột. Tương tự, chúng ta có thể thay đổi thứ tự của hai và ba để tạo đối tượng bố trí lưới ba hàng, hai cột.
package com.company;

import javax.swing.*;
import java.awt.*;

public class GridLayoutExample {

    public static void main(String[] args) {
        // Create and set up a frame window
        JFrame.setDefaultLookAndFeelDecorated(true);
        JFrame frame = new JFrame("GridLayout Example");
        frame.setDefaultCloseOperation(JFrame.EXIT_ON_CLOSE);


        JButton jb1 = new JButton("Button 1");
        JButton jb2 = new JButton("Button 2");
        JButton jb3 = new JButton("Button 3");
        JButton jb4 = new JButton("Button 4");
        JButton jb5 = new JButton("Button 5");

        JPanel panel = new JPanel();
        panel.setLayout(new GridLayout(3, 2));
        panel.add(jb1);
        panel.add(jb2);
        panel.add(jb3);
        panel.add(jb4);
        panel.add(jb5);

        frame.add(panel);
        frame.pack();
        frame.setVisible(true);

    }

}
Kết quả:
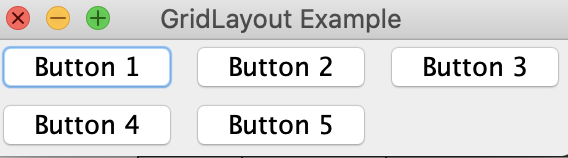
GridBagLayout
Đây là một layout có cơ chế sắp xếp giống như GirdLayout, các phần tử sếp thành một lưới hình chữ nhật. Tuy nhiên nó linh động hơn GridLayout cho phép chúng ta chỉ định vị trí, kích thước của các phần tử trong lưới hình chữ nhật. Mỗi thành phần con trong GridBagLayout đều gắn liền với một GridBagConstraints object chỉ định các thuộc tính như toạ độ dòng và cột, độ rộng của một thành phần con.
 JPanel panel = new JPanel();
        GridBagLayout layout = new GridBagLayout();
        panel.setLayout(layout);
        GridBagConstraints gbc = new GridBagConstraints();

        gbc.fill = GridBagConstraints.HORIZONTAL;
        gbc.gridx = 0;
        gbc.gridy = 0;
        panel.add(new JButton("Button1"), gbc);

        gbc.gridx = 1;
        gbc.gridy = 0;
        panel.add(new JButton("Button 2"), gbc);

        gbc.gridx = 0;
        gbc.gridy = 2;
        gbc.fill = GridBagConstraints.HORIZONTAL;
        gbc.gridwidth = 2;
        panel.add(new JButton("Button 3"), abc);
Kết quả
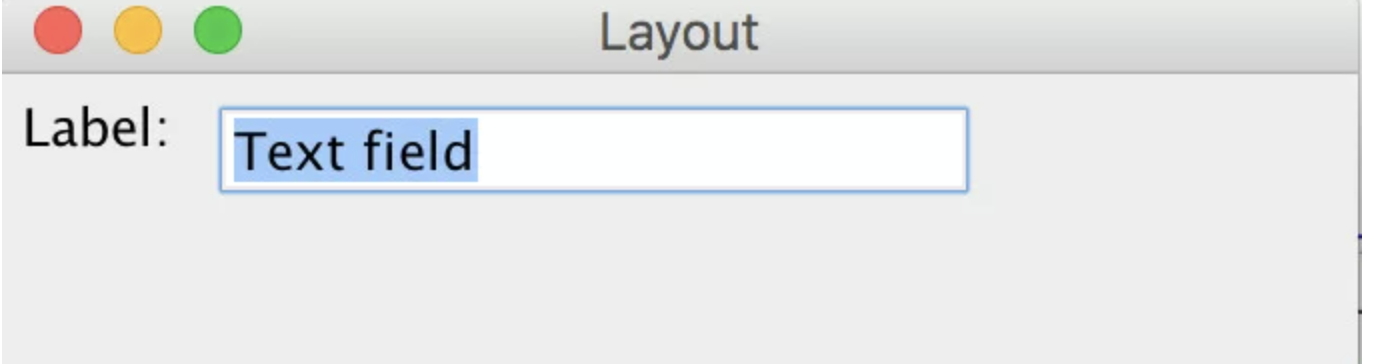
SpringLayout
Lớp SpringLayout trong Java Swing đặt vị trí các con của Container liên kết với nó tuân theo một tập hợp các ràng buộc.
import javax.swing.JLabel;
import javax.swing.JTextField;
import javax.swing.JFrame;
import javax.swing.JPanel;
import javax.swing.SpringLayout;

public class SpringLayoutExample {

    public static void main(String[] args) {
        // Create and set up a frame window
        JFrame.setDefaultLookAndFeelDecorated(true);
        JFrame frame = new JFrame("Layout");
        frame.setDefaultCloseOperation(JFrame.EXIT_ON_CLOSE);

        JPanel panel = new JPanel();
        SpringLayout layout = new SpringLayout();

        JLabel label = new JLabel("Label: ");
        JTextField text = new JTextField("Text field", 15);
        panel.setSize(300, 300);
        panel.setLayout(layout);
        panel.add(label);
        panel.add(text);

        // Thêm các ràng buộc
        layout.putConstraint(SpringLayout.WEST, label, 5, SpringLayout.WEST, panel);
        layout.putConstraint(SpringLayout.NORTH, label, 5, SpringLayout.NORTH, panel);
        layout.putConstraint(SpringLayout.WEST, text, 5, SpringLayout.EAST, label);
        layout.putConstraint(SpringLayout.NORTH, text, 5, SpringLayout.NORTH, panel);

        frame.add(panel);
        frame.pack();
        frame.setVisible(true);

    }

}
Kết quả:
GroupLayout
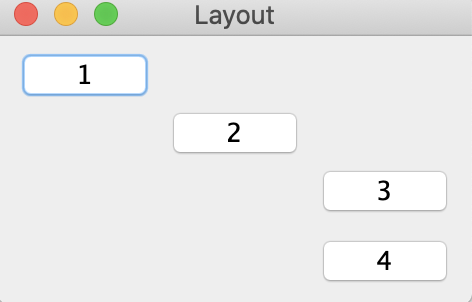
Theo tên gọi của nó, GroupLayout quản lý bố cục của các nhóm theo thứ bậc và đặt chúng ở các vị trí khác nhau. Nó bao gồm hai loại nhóm: nhóm tuần tự và nhóm song song.
Để sắp xếp nhóm tuần tự, các thành phần được đặt rất giống với BoxLayout hoặc FlowLayout, nối tiếp nhau. Vị trí của mỗi thành phần là theo thứ tự của thành phần.
Để sắp xếp nhóm song song, các thành phần được đặt chồng lên nhau tại cùng một vị trí. Chúng có thể được căn chỉnh theo đường cơ sở, trên cùng hoặc dưới cùng ở dọc hoặc căn trái, phải, căn giữa ở trục ngang.
Trong ví dụ sau, bốn nút được tạo với nút 1, 2, 3 theo mẫu tuần tự, trong khi nút 3, 4 được nhóm lại với nhau.
package com.company;

import javax.swing.*;

public class GroupLayoutExample {

    public static void main(String[] args) {
        JFrame.setDefaultLookAndFeelDecorated(true);
        JFrame frame = new JFrame("Layout");
        frame.setDefaultCloseOperation(JFrame.EXIT_ON_CLOSE);

        JButton jb1 = new JButton("1");
        JButton jb2 = new JButton("2");
        JButton jb3 = new JButton("3");
        JButton jb4 = new JButton("4");

        JPanel panel = new JPanel();
        panel.setSize(300, 300);
        GroupLayout layout = new GroupLayout(panel);
        layout.setAutoCreateGaps(true);
        layout.setAutoCreateContainerGaps(true);
        panel.setLayout(layout);

        layout.setHorizontalGroup(layout.createSequentialGroup().addComponent(jb1).addComponent(jb2)
                .addGroup(layout.createSequentialGroup().addGroup(layout
                        .createParallelGroup(GroupLayout.Alignment.LEADING).addComponent(jb3).addComponent(jb4))));
        layout.setVerticalGroup(
                layout.createSequentialGroup().addComponent(jb1).addComponent(jb2).addComponent(jb3).addComponent(jb4));
        frame.add(panel);
        frame.pack();
        frame.setVisible(true);

    }

}
Kết quả
Cách sử dụng các Layout
Qua bài viết trên thì chúng ta đã tìm hiểu được tất cả các Layout mà Java Swing cung cấp, hiểu đơn giản nó chỉ là các công cụ cho phép chúng ta canh chỉnh các phần tử con theo cấu trúc nhất định.
Tuy nhiên các bạn hãy ghi nhớ rằng, không bao giờ có thể sử dụng duy nhất một trong các layout trên là có thể xây dựng xong một ứng dụng trừ khi nó quá đơn giản. Chứ còn trong thực tế thì chúng ta phải kết hợp chúng nhuần nhuyễn để có một giao diện đẹp mà code lại đơn giản.
Ví dụ cho một giao diện sau các bạn thử nghỉ cách sử dụng và kết hợp các layout nào nhé. Tất nhiên là có rất nhiều cách nên đừng có ngại sao lại làm khác mình nhé, miễn sao ra là được.
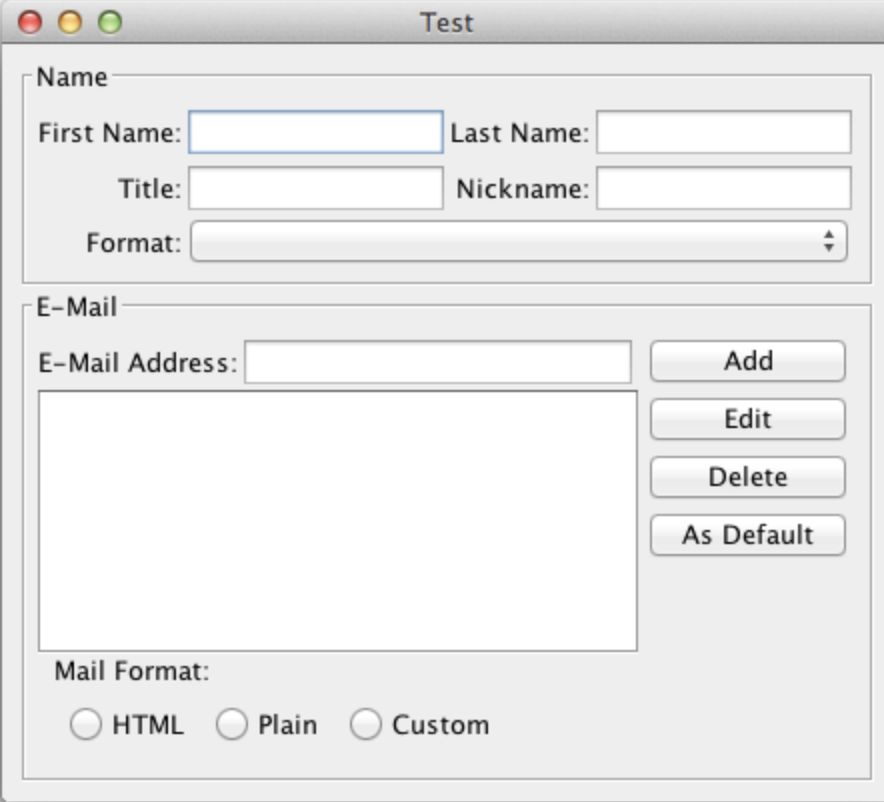
Gợi ý:
- Sử dụng BorderLayout hoặc BoxLayout để chia giao diện lớn thành 2 phần nhỏ gồm NamePanel chứa mẫu nhập thông tin người dùng, và EmailPanel là phần còn lại.
- Những thành phần nhỏ bên trong chúng ta có thể sử dụng GridBagLayout để sắp xếp các thành phần theo dạng lưới. Mình thường dùng GridBagLayout thay vì GridLayout vì nó linh hoạt hơn và gần như có thể thay thế GridLayout.
- Các CheckBox ở phần MailFormat có thể sử dụng FlowLayout để canh các phần tử theo hàng ngang từ trái sang phải.
Code tham khảo
public class TestLayout13 {

    public static void main(String[] args) {
        new TestLayout13();
    }

    public TestLayout13() {
        EventQueue.invokeLater(new Runnable() {
            @Override
            public void run() {
                try {
                    UIManager.setLookAndFeel(UIManager.getSystemLookAndFeelClassName());
                } catch (ClassNotFoundException ex) {
                } catch (InstantiationException ex) {
                } catch (IllegalAccessException ex) {
                } catch (UnsupportedLookAndFeelException ex) {
                }

                JFrame frame = new JFrame("Test");
                frame.setDefaultCloseOperation(JFrame.EXIT_ON_CLOSE);
                frame.setLayout(new BorderLayout());
                frame.add(new FormPane());
                frame.pack();
                frame.setLocationRelativeTo(null);
                frame.setVisible(true);
            }

        });
    }

    public class FormPane extends JPanel {

        public FormPane() {
            setBorder(new EmptyBorder(8, 8, 8, 8));
            setLayout(new GridBagLayout());
            GridBagConstraints gbc = new GridBagConstraints();
            gbc.gridx = 0;
            gbc.gridy = 0;
            gbc.fill = GridBagConstraints.BOTH;
            gbc.weightx = 1;

            NamePane namePane = new NamePane();
            namePane.setBorder(new CompoundBorder(new TitledBorder("Name"), new EmptyBorder(4, 4, 4, 4)));
            add(namePane, gbc);

            gbc.gridy++;

            EMailPane emailPane = new EMailPane();
            emailPane.setBorder(new CompoundBorder(new TitledBorder("E-Mail"), new EmptyBorder(4, 4, 4, 4)));
            add(emailPane, gbc);
        }

    }

    public class NamePane extends JPanel {

        public NamePane() {
            setLayout(new GridBagLayout());
            GridBagConstraints gbc = new GridBagConstraints();
            gbc.gridx = 0;
            gbc.gridy = 0;
            gbc.anchor = GridBagConstraints.EAST;

            add(new JLabel("First Name:"), gbc);
            gbc.gridx += 2;
            add(new JLabel("Last Name:"), gbc);
            gbc.gridy++;
            gbc.gridx = 0;
            add(new JLabel("Title:"), gbc);
            gbc.gridx += 2;
            add(new JLabel("Nickname:"), gbc);

            gbc.gridx = 1;
            gbc.gridy = 0;
            gbc.fill = GridBagConstraints.HORIZONTAL;
            gbc.anchor = GridBagConstraints.WEST;
            gbc.weightx = 0.5;
            add(new JTextField(10), gbc);
            gbc.gridx += 2;
            add(new JTextField(10), gbc);
            gbc.gridy++;
            gbc.gridx = 1;
            add(new JTextField(10), gbc);
            gbc.gridx += 2;
            add(new JTextField(10), gbc);

            gbc.gridx = 0;
            gbc.gridy++;
            gbc.anchor = GridBagConstraints.EAST;
            gbc.weightx = 0;
            gbc.fill = GridBagConstraints.NONE;
            add(new JLabel("Format:"), gbc);

            gbc.anchor = GridBagConstraints.WEST;
            gbc.gridx++;
            gbc.weightx = 1;
            gbc.fill = GridBagConstraints.HORIZONTAL;
            gbc.gridwidth = GridBagConstraints.REMAINDER;
            add(new JComboBox(), gbc);
        }
    }

    protected class EMailPane    extends JPanel {

        public EMailPane() {
            JPanel detailsPane = new JPanel(new GridBagLayout());
            GridBagConstraints gbc = new GridBagConstraints();
            gbc.gridx = 0;
            gbc.gridy = 0;
            gbc.anchor = GridBagConstraints.EAST;
            detailsPane.add(new JLabel("E-Mail Address:"), gbc);

            gbc.gridx++;
            gbc.anchor = GridBagConstraints.WEST;
            gbc.weightx = 1;
            gbc.fill = GridBagConstraints.HORIZONTAL;
            detailsPane.add(new JTextField(10), gbc);

            gbc.gridy++;
            gbc.gridx = 0;
            gbc.fill = GridBagConstraints.BOTH;
            gbc.weighty = 1;
            gbc.gridwidth = GridBagConstraints.REMAINDER;
            detailsPane.add(new JScrollPane(new JList()), gbc);

            JPanel buttonsPane = new JPanel(new GridBagLayout());
            gbc = new GridBagConstraints();
            gbc.gridx = 0;
            gbc.gridy = 0;
            gbc.weightx = 1;
            gbc.fill = GridBagConstraints.HORIZONTAL;

            buttonsPane.add(new JButton("Add"), gbc);
            gbc.gridy++;
            buttonsPane.add(new JButton("Edit"), gbc);
            gbc.gridy++;
            buttonsPane.add(new JButton("Delete"), gbc);

            gbc.gridy++;
            gbc.weighty = 1;
            gbc.anchor = GridBagConstraints.NORTH;
            buttonsPane.add(new JButton("As Default"), gbc);

            JPanel formatPane = new JPanel(new FlowLayout(FlowLayout.LEFT));
            formatPane.setBorder(new TitledBorder(new EmptyBorder(1, 1, 1, 1), "Mail Format:"));
            formatPane.add(new JRadioButton("HTML"));
            formatPane.add(new JRadioButton("Plain"));
            formatPane.add(new JRadioButton("Custom"));

            setLayout(new BorderLayout());
            add(detailsPane);
            add(buttonsPane, BorderLayout.LINE_END);
            add(formatPane, BorderLayout.PAGE_END);
        }
    }
Nguồn tham khảo
https://examples.javacodegeeks.com/java-swing-layouts-example/
https://stackoverflow.com/questions/13238884/which-layout-manager-to-use