Mục lục
JList là một trong những component được sử dụng rất nhiều trong Java Swing giúp hiển thị một tập hợp các phần tử và cho phép người dùng có thể chọn một hoặc nhiều phần tử trong số chúng.
Khởi tạo JList
Để tạo một đối tượng JList trong Swing chúng ta có thể sử dụng một trong số constructor sau:
- JList() – Tạo JList rỗng.
- JList(E[] items) – Tạo một JList với các phần tử items được chỉ định trong mảng.
- JList(ListModel model) – Tạo một JList với Model được chỉ định sẵn.
- JList(Vector items) – Tạo một JList với các phần tử items được chỉ định trong Vector.
Một số hàm thường xuyên sử dụng trong JList:
- getSelectedIndex() – Trả về vị trí của phần tử đang được chọn.
- getSelectedValue() – Trả về giá trị của phần tử đang được chọn.
- setSelectedIndex(int i) – Chọn phần tử tại vị trí i.
- setSelectionBackground(Color c) – Thay đổi màu nền của phần tử đang được chọn.
- setSelectionForeground(Color c) – Thay đổi màu chữ của phần tử đang được chọn.
- setListData(E [ ] l) – Đặt danh sách các phần tử mới trong mảng vào JList, các phần tử đang tồn tại trong Jlist sẽ bị thay thế.
- setVisibleRowCount(int v) – Thay đổi visibleRowCount.
- setSelectedValue(Object a, boolean s) – Chọn phần tử dựa vào giá trị.
- setListData(Vector l) – Đặt danh sách các phần tử mới trong vector vào JList, các phần tử đang tồn tại trong Jlist sẽ bị thay thế.
- getSelectedValuesList() – Trả về danh sách các phần tử đang được chọn.
- getMinSelectionIndex() – Trả về vị trí nhỏ nhất của phần tử được chọn, -1 nếu không có phần tử nào được chọn.
- getMaxSelectionIndex() – Trả về vị trí lớn nhất của phần tử được chọn, -1 nếu không có phần tử nào được chọn.
- getLastVisibleIndex() – Trả về vị trí lớn nhất của phần tử trong JList.
Tạo JList đơn giản
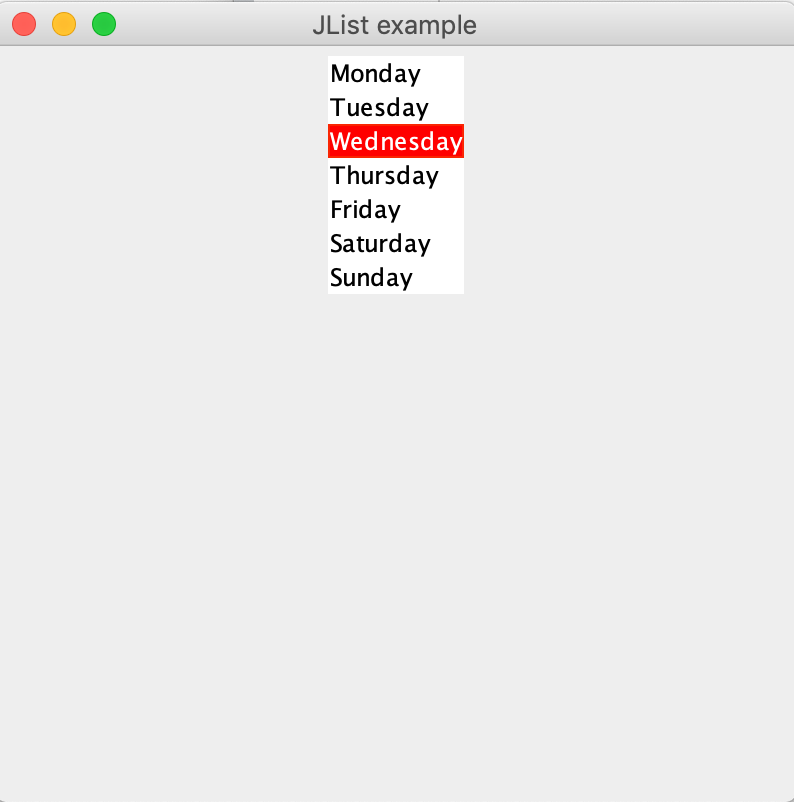
Trong ví dụ dưới đây mình sẽ tạo ra một JList hiển thị danh sách các ngày trong tuần. Khi một ngày được chọn nó sẽ được tô màu nền đỏ lên để dễ nhận biết.
import java.awt.*;
import javax.swing.*;

class JListExample {

    public static void main(String[] args) {
        //create a new frame
        JFrame f = new JFrame("JList example");

        //create a panel
        JPanel p = new JPanel();


        //String array to store weekdays
        String week[] = {"Monday", "Tuesday", "Wednesday",
                "Thursday", "Friday", "Saturday", "Sunday"};

        //create list
        JList jList = new JList(week);

        jList.setSelectionBackground(Color.RED);

        // Chon phan tu tai vi tri thu 2 khi vua khoi tao
        jList.setSelectedIndex(2);

        p.add(jList);

        f.add(p);

        //set the size of frame
        f.setSize(400, 400);
        f.setLocationRelativeTo(null);
        f.setVisible(true);
    }


}
Output
Xử lý sự kiện trong JList
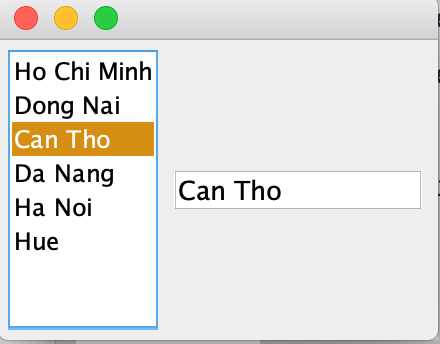
Trong phần này chúng ta sẽ đi qua một ví dụ lắng nghe sự kiện khi người dùng chọn vào một phần tử nào đó trong JList thì sẽ lấy giá trị được chọn đó hiển thị lên một JTextField đã được khởi tạo trước đó.
import javax.swing.*;
import javax.swing.event.ListSelectionEvent;
import javax.swing.event.ListSelectionListener;

public class Main {


    public static void main(String args[]) {
        JFrame frame = new JFrame();
        frame.setDefaultCloseOperation(WindowConstants.EXIT_ON_CLOSE);

        JList jList = new JList();
        String[] data = new String[] {
                "Ho Chi Minh",
                "Dong Nai",
                "Can Tho",
                "Da Nang",
                "Ha Noi",
                "Hue"
        };

        jList.setListData(data);
        JPanel jPanel = new JPanel();
        JTextField jTextField = new JTextField();
        jTextField.setText("jTextField1");
        jTextField.setColumns(10);
        // Xu ly su kien
        jList.addListSelectionListener(new ListSelectionListener() {
            @Override
            public void valueChanged(ListSelectionEvent e) {
                jTextField.setText(data[jList.getSelectedIndex()]);
            }
        });
        jPanel.add(new JScrollPane(jList));
        jPanel.add(jTextField);
        frame.add(jPanel);
        frame.pack();
        frame.setLocationRelativeTo(null);
        frame.setVisible(true);
    }
}
Output
Tạo JList Scroll trong Java Swing
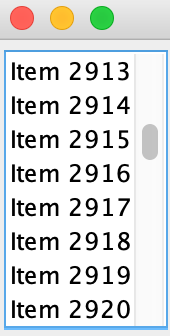
Như các bạn biết rằng JList có thể được sử dụng để hiển thị một danh sách rất nhiều dữ liệu. Trong trường hợp này thì chiều cao của JList không có cách nào đáp ứng đủ để hiển thị tất cả những dữ liệu này.
Thật may, chúng ta có thể tạo một JList cho phép người dùng scroll qua các phần tử nhờ vào JScrollPane. Ví dụ sau sẽ tạo một lượng dữ liệu 10000 dòng hiển thị trong JList.
import javax.swing.*;

public class Main {


    public static void main(String args[]) {
        JFrame frame = new JFrame();
        frame.setDefaultCloseOperation(WindowConstants.EXIT_ON_CLOSE);

        JList jList = new JList();

        String[] data = new String[10000];

        for(int i = 0; i < 10000; i++) {
            data[i] = "Item " + i;
        }

        jList.setListData(data);
        JPanel jPanel = new JPanel();
        jPanel.add(new JScrollPane(jList));
        frame.add(jPanel);
        frame.pack();
        frame.setLocationRelativeTo(null);
        frame.setVisible(true);
    }
}
Output
Multiple select trong JList
Nếu danh sách các phần tử của bạn người dùng có thể lựa chọn nhiều hơn một thì bạn có thể sử dụng setSelectionMode(DefaultListSelectionModel.MULTIPLE_INTERVAL_SELECTION)
import java.awt.BorderLayout;

import javax.swing.*;

public class Main {
    static String labels[] = { "A", "B", "C", "D", "E", "F", "G" };

    public static void main(String args[]) {
        JFrame frame = new JFrame("Modifying Model");
        frame.setDefaultCloseOperation(WindowConstants.EXIT_ON_CLOSE);

        JList jlist = new JList(new String[]{"A","B","C"});
      jlist.setSelectionMode(DefaultListSelectionModel.MULTIPLE_INTERVAL_SELECTION);


        JScrollPane scrollPane1 = new JScrollPane(jlist);
        frame.add(scrollPane1, BorderLayout.CENTER);

        frame.setSize(640, 300);
        frame.setVisible(true);
    }
}
Custom JList để hiển thị một Object
Nảy giờ chúng ta có thể thấy tất cả các ví dụ chỉ thao tác trên các kiểu dữ liệu cơ bản như String, Integer, etc.
Trong phần này chúng ta sẽ cùng nhau tìm hiểu làm sao để hiển thị danh sách các BookEntry object với BookEntry class do chúng ta tự định nghĩa.
class BookEntry {
    private final String title;

    private final String imagePath;

    private ImageIcon image;

    public BookEntry(String title, String imagePath) {
        this.title = title;
        this.imagePath = imagePath;
    }

    public String getTitle() {
        return title;
    }

    public ImageIcon getImage() {
        if (image == null) {
            image = new ImageIcon(imagePath);
        }
        return image;
    }

    // Override standard toString method to give a useful result
    public String toString() {
        return title;
    }
}
Lưu ý trong BookEntry class chúng ta phải override lại toString() method vì nó sẽ được sử dụng để lấy String hiển thị trên JList.
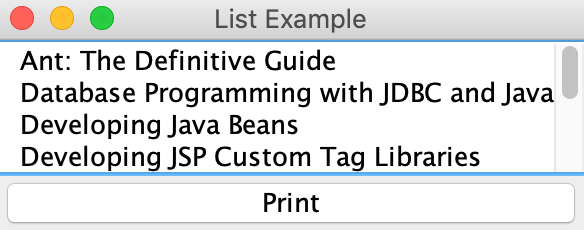
Phần còn lại chúng ta chỉ cần áp dụng các kiến thức ở trên là xong, trong ví dụ này mình sẽ hiển trị danh sách các BookEntry, và cho phép ngừoi dùng chọn Button Print để in tên lên màn hình console.
import java.awt.BorderLayout;
import java.awt.Color;
import java.awt.Component;
import java.awt.event.ActionEvent;
import java.awt.event.ActionListener;

import javax.swing.ImageIcon;
import javax.swing.JButton;
import javax.swing.JFrame;
import javax.swing.JLabel;
import javax.swing.JList;
import javax.swing.JPanel;
import javax.swing.JScrollPane;
import javax.swing.ListCellRenderer;

public class Main extends JPanel {

    private BookEntry books[] = {
            new BookEntry("Ant: The Definitive Guide", "1.gif"),
            new BookEntry("Database Programming with JDBC and Java",
                    "2.gif"),
            new BookEntry("Developing Java Beans", "3.gif"),
            new BookEntry("Developing JSP Custom Tag Libraries",
                    "4.gif"),
            new BookEntry("Java 2D Graphics", "4.gif"),
            new BookEntry("Java and XML", "5.gif"),
            new BookEntry("Java and XSLT", "1.gif"),
            new BookEntry("Java and SOAP", "2.gif"),
            new BookEntry("Learning Java", "3.gif") };

    private JList booklist = new JList(books);

    public Main() {
        setLayout(new BorderLayout());
        JButton button = new JButton("Print");
        button.addActionListener(new PrintListener());

        booklist = new JList(books);
        booklist.setCellRenderer(new BookCellRenderer());
        booklist.setVisibleRowCount(4);
        JScrollPane pane = new JScrollPane(booklist);

        add(pane, BorderLayout.NORTH);
        add(button, BorderLayout.SOUTH);
    }

    public static void main(String s[]) {
        JFrame frame = new JFrame("List Example");
        frame.setDefaultCloseOperation(JFrame.EXIT_ON_CLOSE);
        frame.setContentPane(new Main());
        frame.pack();
        frame.setVisible(true);
    }

    // An inner class to respond to clicks on the Print button
    class PrintListener implements ActionListener {
        public void actionPerformed(ActionEvent e) {
            int selected[] = booklist.getSelectedIndices();
            System.out.println("Selected Elements:  ");

            for (int i = 0; i < selected.length; i++) {
                BookEntry element = (BookEntry) booklist.getModel()
                        .getElementAt(selected[i]);
                System.out.println("  " + element.getTitle());
            }
        }
    }
}

class BookEntry {
    private final String title;

    private final String imagePath;

    private ImageIcon image;

    public BookEntry(String title, String imagePath) {
        this.title = title;
        this.imagePath = imagePath;
    }

    public String getTitle() {
        return title;
    }

    public ImageIcon getImage() {
        if (image == null) {
            image = new ImageIcon(imagePath);
        }
        return image;
    }

    // Chuoi dai dien hien thi tren JList
    public String toString() {
        return title;
    }
}

class BookCellRenderer extends JLabel implements ListCellRenderer {
    private static final Color HIGHLIGHT_COLOR = new Color(0, 0, 128);

    public BookCellRenderer() {
        setOpaque(true);
        setIconTextGap(12);
    }

    public Component getListCellRendererComponent(JList list, Object value,
                                                  int index, boolean isSelected, boolean cellHasFocus) {
        BookEntry entry = (BookEntry) value;
        setText(entry.getTitle());
        setIcon(entry.getImage());
        if (isSelected) {
            setBackground(HIGHLIGHT_COLOR);
            setForeground(Color.white);
        } else {
            setBackground(Color.white);
            setForeground(Color.black);
        }
        return this;
    }
}
Output
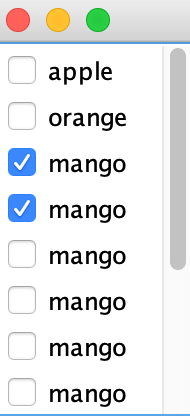
Tạo JList với các phần tử là Checkbox
Để tạo ra một JList với mỗi phần tử là một JCheckBox trước tiên, chúng ta cần định nghĩa một CheckListItem đại diện cho mỗi CheckBox
class CheckListItem {

  private String label;
  private boolean isSelected = false;

  public CheckListItem(String label) {
    this.label = label;
  }

  public boolean isSelected() {
    return isSelected;
  }

  public void setSelected(boolean isSelected) {
    this.isSelected = isSelected;
  }

  @Override
  public String toString() {
    return label;
  }
}
Tương tự như trên, chúng ta cần override toString() dùng để hiển thị trong JList.
Tiếp theo chúng ta cần triển khai một trình render giao diện triển khai từ ListCellRenderer và kế thừa từ JCheckBox.
class CheckListRenderer extends JCheckBox implements ListCellRenderer {
  public Component getListCellRendererComponent(JList list, Object value,
      int index, boolean isSelected, boolean hasFocus) {
    setEnabled(list.isEnabled());
    setSelected(((CheckListItem) value).isSelected());
    setFont(list.getFont());
    setBackground(list.getBackground());
    setForeground(list.getForeground());
    setText(value.toString());
    return this;
  }
}
Cuối cùng sử dụng setCellRenderer() để sử dụng CheckListRenderer mà chúng ta vừa tạo ở trên.
public class Main {

    public static void main(String args[]) {
        JFrame frame = new JFrame();
        frame.setDefaultCloseOperation(JFrame.EXIT_ON_CLOSE);
        JList list = new JList(new CheckListItem[] { new CheckListItem("apple"),
                new CheckListItem("orange"), new CheckListItem("mango"),
                new CheckListItem("mango"),
                new CheckListItem("mango"),
                new CheckListItem("mango"),
                new CheckListItem("mango"),
                new CheckListItem("mango"),
                new CheckListItem("mango"),
                new CheckListItem("mango"),
                new CheckListItem("mango"),

                new CheckListItem("paw paw"), new CheckListItem("banana") });
        list.setCellRenderer(new CheckListRenderer());
        list.setSelectionMode(ListSelectionModel.SINGLE_SELECTION);
        list.addMouseListener(new MouseAdapter() {
            @Override
            public void mouseClicked(MouseEvent event) {
                JList list = (JList) event.getSource();
                int index = list.locationToIndex(event.getPoint());// Get index of item
                // clicked
                CheckListItem item = (CheckListItem) list.getModel().getElementAt(index);
                item.setSelected(!item.isSelected()); // Toggle selected state
                list.repaint(list.getCellBounds(index, index));// Repaint cell
            }
        });
        frame.getContentPane().add(new JScrollPane(list));
        frame.pack();
        frame.setVisible(true);
    }
}
Output
Nguồn tham khảo
https://www.geeksforgeeks.org/java-swing-jlist-with-examples/
http://www.java2s.com/Tutorials/Java/Swing_How_to/JList/index.htm