Mục lục
Button được biến đến như là một control được sử dụng rất nhiều trong Java Swing cùng với Label, TextField, etc. Trong bài viết này chúng ta sẽ cùng nhau tìm hiểu nhanh cách để tạo, sử dụng và tuỳ biến một Button theo mục đích riêng của chúng ta.
Cách tạo Button trong Java Swing
Để khởi tạo một Button trong Java Swing chúng ta có thể làm như sau:
JButton btn = new JButton("Click Button");
Ví dụ tạo Button và xử lý sự kiện
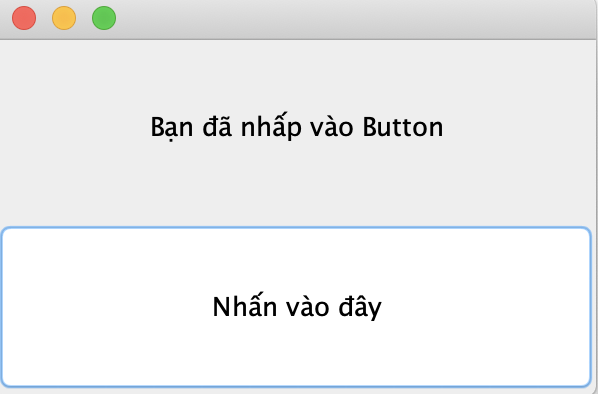
Sau mình sẽ tạo một chương trình minh hoạ cách sử dụng Button và xử lý sự kiện khi người dùng nhấp vào Button thì mình sẽ hiện thị dòng chữ “Bạn đã nhấp vào Button”.
import javax.swing.*;
import java.awt.*;
import java.awt.event.ActionEvent;
import java.awt.event.ActionListener;

class JButtonExample extends JFrame {
    private JLabel lb;

    public JButtonExample() {
        // create JFrame
        setDefaultCloseOperation(JFrame.EXIT_ON_CLOSE);
        setSize(300, 200);
        setLayout(new GridLayout(2, 1, 5, 5));

        // create JLabel
        lb = new JLabel("Label Title");
        lb.setHorizontalAlignment(JLabel.CENTER);
        add(lb);

        // Tạo Button
        JButton btn = new JButton("Nhấn vào đây");
        // Lắng nghe sự kiện Click và xử lý
        btn.addActionListener(new ActionListener() {
            @Override
            public void actionPerformed(ActionEvent arg0) {
                changeTextJLabel();

            }
        });
        add(btn);

        // display JFrame
        setLocationRelativeTo(null);
        setVisible(true);
    }

    // change text of lb
    private void changeTextJLabel() {
        lb.setText("Bạn đã nhấp vào Button");
    }

    public static void main(String[] args) {
        new JButtonExample();
    }
}
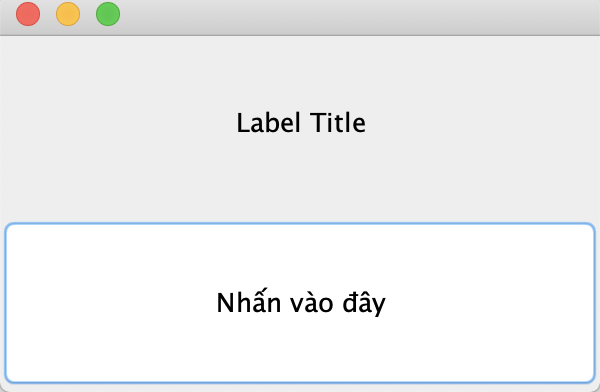
Kết quả:
Khi mới khởi chạy
Sau khi nhấp vào Button
Tạo Button với Icon Trong Swing
Mặc định thì khi khởi tạo một JButton chỉ có đoạn văn bảng đại diện cho Button, chúng ta có thể thêm các hình ảnh vào Button cho sinh động đẹp mắt thêm như sau.
Button chỉ chứa hình
JButton button = new JButton(new ImageIcon("images/start.gif"));
Button chứa cả hình và chữa
JButton button = new JButton("Start", new ImageIcon("images/start.gif"));
Xử lý sự kiện trong Button
Để xử lý sự kiện khi người dùng nhấp vào Button chúng ta có thể làm như sau:
button.addActionListener(new ActionListener() {
    @Override
    public void actionPerformed(ActionEvent evt) {
        // do everything here...
    }
});
Sự kiện double click Button
Để xử lý sự kiện double click trên Button, chúng ta phải cần dùng đến addMouseListener() nhận vào một instance của class thừa kế từ MouseAdapter cho phép chúng ta nhận một sự kiện
import java.awt.event.MouseAdapter;
import java.awt.event.MouseEvent;

import javax.swing.JFrame;
import javax.swing.JTextField;

public class Main {
  public static void main(String[] argv) throws Exception {

    JTextField component = new JTextField();
    component.addMouseListener(new MyMouseListener());
    JFrame f = new JFrame();

    f.add(component);
    f.setSize(300, 300);
    f.setVisible(true);

    component.addMouseListener(new MyMouseListener());
  }
}

class MyMouseListener extends MouseAdapter {
  public void mouseClicked(MouseEvent evt) {
    if (evt.getClickCount() == 3) {
      System.out.println("triple-click");
    } else if (evt.getClickCount() == 2) {
      System.out.println("double-click");
    }
  }
}
Tạo phím tắt, phím ghi nhớ cho Button
Nếu các bạn để ý thì hầu hết các ứng dụng đều tạo một số phím tắt, phím ghi nhớ dùng cho các chức năng sử dụng nhiều.
Ví dụ tạo phím nhớ ALT + E để gọi đến sự kiện nhấp vào Button Edit.
Các bạn có thể thấy Button Edit được gạch dưới từ E,báo hiệu rằng chúng ta có thể gọi nhanh nó thông qua ALT + E.![]()
button.setMnemonic(KeyEvent.VK_E);
Hoặc chúng ta có thể tạo các phím nóng bằng cách sau:
String mapKey = "KEY_F2";
InputMap inputMap = button.getInputMap(JComponent.WHEN_IN_FOCUSED_WINDOW);
inputMap.put(KeyStroke.getKeyStroke("F2"), mapKey);

button.getActionMap().put(mapKey, new AbstractAction() {
    public void actionPerformed(ActionEvent evt) {
        buttonActionPerformed(evt);
    }
});
Trong ví dụ trên mình đã tạo một phím nóng F2 để gọi đến sự kiện nhấp chuột vào Button, khi đó hàm xử lý sự kiện sẽ được thực thi.
Tuỳ biến giao diện Button
Một số thao thác thường dùng với Button như thay đổi màu nền với setBackground().
button.setBackground(Color.YELLOW);
Hay xác định Font, cỡ chữ
button.setFont(new java.awt.Font("Arial", Font.BOLD, 14));
Nguồn tham khảo
https://www.codejava.net/java-se/swing/jbutton-basic-tutorial-and-examples
http://www.java2s.com/Tutorial/Java/0260__Swing-Event/DetectingDoubleandTripleClicks.htm

